Art-dolls were a new phenomenon for the Dutch Chamber of Commerce in 2012. I had come to register my new company. Unfortunately, the employee at the desk couldn’t find the right category for my business. These dolls weren’t meant for kids. At the same time, they weren’t traditional art either.
“How about ‘sculptor’?”, I tried to be helpful.
“Can’t”, she answered, as she leafed through the Commerce’s Handbook. “Sculptors only work in bronze or stone.” The Dutch like their definitions to be as narrow and impractical as possible. I tried a couple of other of other labels. ‘Doll-maker’. ‘3d-artist’. ‘Conceptual artist’. None of them sufficed. Finally though, she found her own EUREKA-moment and I could return home with a proof of registration and the right to earn money by making art!
Call Me “Fiddy”
Being the CEO of a toy factory situated in my living room, I know a thing or two about this week’s topic: Why is art so bloody expensive?
One of the most frequent emails I receive are variants of: “Hi, I really like your work, but think the asking price is ridiculous. How about fifty bucks instead!”
Sometimes they ask me to sculpt them a true one of a kind custom sculpture, made with one of their sketches as a reference, for fifty bucks. Fifty really seems to be the magic number here.
There are plenty of circumstances in which half a yard can seem quite spacious, but for others it can be cramping their style. Since I am a sculptor, let’s use bronze sculpture as an example to explain the process of making art and the money involved. At first blush, it can be obvious why bronze sculptures cost so much. Metal is expensive. Compared to a pencil drawing, it’s no wonder why this sculpture would like to invite your monthly income to dinner. And yet, when taking a peek behind the curtain, you’ll quickly realize that the materials are not what are driving up the cost. It’s good old labor.
The Many Stages Of Repetition
Making bronzes is an intensive process requiring several semi-repeating steps:
1. The Master Sculpt It all starts with the sculpture itself. The material doesn’t really matter. Clay, stone, wax, resin, metal even. I myself prefer to use a non-hardening clay, even though using wax would’ve let me skip a step (or two).
2. Spruing Before you can make a mold of a sculpture, you need to add sprues. Sprues provide paths for wax or resin to flow down and – almost as important – for air to escape. A simple sculpture usually only needs a pouring cup as a sprue. My sculptures on the other hand are a bit more involved. By the end of this stage, they look like something resembling a tree stump growing long, curved roots got stuck to it.
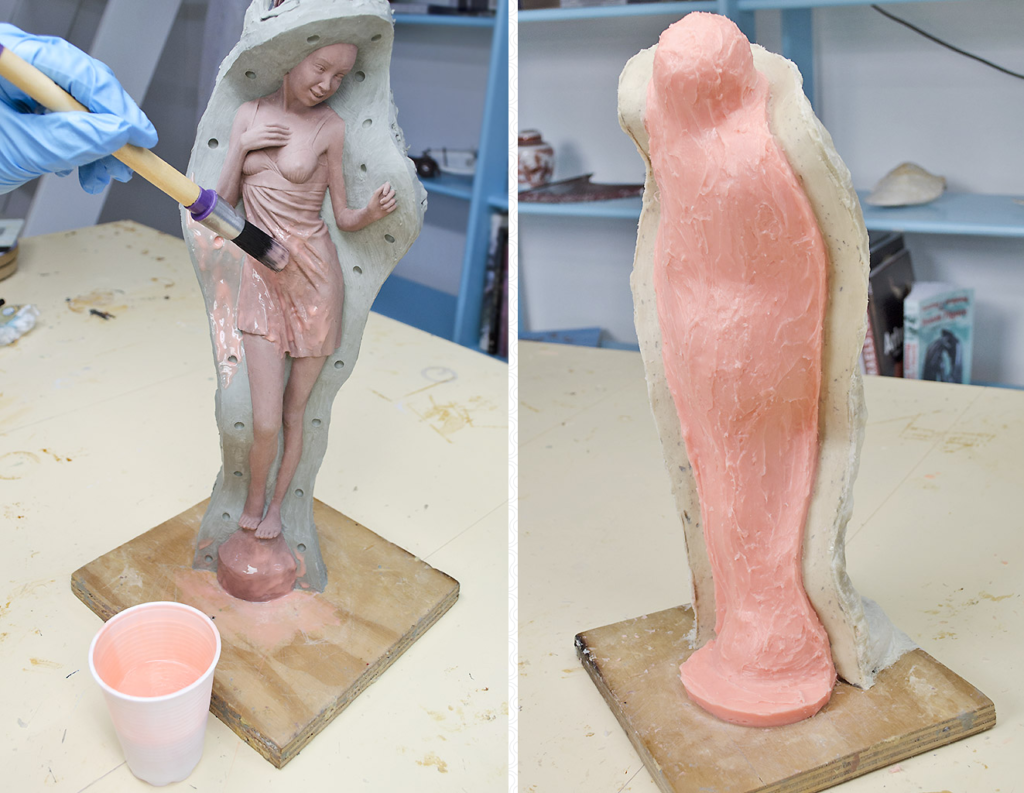
3. Silicone Mold With the master sculpt finished, I create a mold that allows me to cast wax models. This mold is made of two parts. A 1cm thick inner layer made of silicone is an exact negative of the sculpture. And a rigid outer shell made of a light epoxy, to make sure the mold isn’t going to warp.
Because my master sculpts are quite fragile, they usually do not survive this process.
4. Wax cast Now that I have a silicone mold, I can pour hot wax into it. Small molds I simply fill up completely and leave to cool. For bigger molds, I use a technique called ‘slush-casting’. You pour a little hot wax into the mold, then rotate and swish, until an even coating covers the inside. The remaining wax is poured out. You then continue, until you have the desired thickness of the walls.
5. Mold Cleaning Silicone molds are quite durable. As long as you take care of them, that is. So! After taking out the cast, I clean up the mold, close it again and put it away safely.
6. Chasing No wax cast, no matter how carefully poured will come out perfectly. For starters, There are the sprues and parting lines. I’ll remove those. Then, there are airpockets. They need filling. The molten wax did not reach every corner of the mold completely. Details got lost in the process. I’ll have to sculpt them again. Until the wax cast is a perfect replica of the original, I can’t move to the next stage:
7. Sprue 2 Now it is time for the people of the art foundry to do their magic. I’m leaving my wax model into their care. And the first thing they often do is cut up my perfectly prepared wax cast! … Damn. But since this will facilitate the bronze casting later on, they’re forgiven. Then, these pieces are also sprued.
8. Mold Making 2 For this second mold it is imperative that they use a fireproof material. Depending on the casting method and the size of the sculpture, materials and techniques may vary.
9. Burnout. This mold is fired in a kiln, cup down. The wax melts and runs out. And all that remains is the negative space where liquid bronze will soon be poured through.
10 Bronze Casting. Now, it’s time to make an actual bronze cast of the clay sculpture we started with. This is dangerous work that needs specialists. I do not take part in it. Everbody participating in this stage is a professional working at the art foundry.
11. Destruction of the mold Unlike the silicone mold, the only way to open up the fireproof mold, is to destroy it. By carefully hammering away the unwanted material, slowly the bronze cast underneath is revealed.
12. Sprue removal and welding This rough cast looks nothing like the final product. It’s a coarse heap of metal. A surface that looks a lot like grey sandpaper.
The people at the art foundry will remove the first sprues so they are alble to weld the first pieces back together. Then they give this Frankenstinian monster back to me. The final touch ups are for me fix.
13. Metal Chasing In many ways, metal chasing is oddly similar to working on a wax cast. The main difference is that instead of using a knife to remove sprues, I’m now using an angle grinder. When fixing flaws, I’m now using rotary tools, or a good old hammer and punches. Bronze is a very pliable material. It reminds me of clay in a way. If for instance, the lips of a figure came out a bit crooked, you can use a hammer and softly tap on a punch to fix the curve.
14. Polishing The imperfections are repaired. Sprues removed. It’s time to let the bronze come out from under that sandy residue. Buffing up the surface shows just how beautiful of material bronze really is.
15. Patina With your sculpture standing in front of you in its shiny and polished bronze glory, now it’s time to work some magic with chemicals. Patinas not only give our sculptures those wild colors, but also protect them from rust. They are vital in giving these sculptures their longevity.
The Price Of Labor
Despite me being a factory owner on paper – due to the Dutch chamber of commerce’s befuddlement of the concept of ‘art dolls’ – my work isn’t factory produced. These are handcrafted products. Where a machine can spit out tens, hundreds or even thousands of copies each day, it takes me months to finish one. Factories can offset the price by producing huge print runs. I can’t. They cut corners by using subpar materials. I won’t. They move to countries with lower wages and often lax labor laws. I refuse.
So that is the long and short of why art is so bloody expensive. But the main question should be: Do you think that the art piece you love worth its asking price?